Sunday, March 30, 2014

Back to the Beach

The Nova headed back to the beach today. Is there more to do? Always. But you've got to enjoy them for a while between projects and there are a few things I need to do on the old girl who finally gets her place back in the garage.
Our version of Scooter and the Big Man.

"Hey Dad how about an LS2 swap?"
Father and Son bonding. "I've fallen and I can't get up."

Sunday, March 23, 2014

Coil Overs for the Front

After driving the Nova for a few weeks it became apparent that the front end had settled a little too much with the 2" drop spindles and the 2" drop pocket in the A-arms, the springs settled and the ride height dropped to the point the passenger tire would rub on turns. Since only driving in a straight line was not an option I needed to resolve the issue. With an extra 1" of lift and taller bump stops are needed.

Lift Options
The easy fix would be spring isolaters on top and bottom of the springs which should give me an extra ~1" of suspension lift. The challenge with this is, since I am are right on the edge of the ride height if there is any more settling, I'd be right back in the same boat.

An interesting alternative would be Adjustable Spring Spacers from All Star Performance Racing.These would allow me to dial in ride height and the pockets in these a-arms would be the perfect spot for these to sit. For only $40 this is a poor-mans adjustable suspension. My only observation is... these do not appear to be adjustable on the car. My guess is you would need to drop the lower a-arm to turn the base also there is no lock nut to keep it from rotating.

Another option is to pick another spring. The big challenge with that is we would still be guessing at what the final ride height would be.
I decided to go with a set of QA1 coil over shock/springs. These offer the advantage of being able to dial in the ride height on the car.

The installation on these is pretty straight forward. My advice is to definitely buy the wrench set and the thrust bearings. I got the non-adjustable shocks (this is to adjust how stiff the shock valving is the ride height is adjustable with the coil-over). In addition, I also highly recommend using the anti-seize as recommended in the instructions.

After removing my old springs and shocks the QA1s are a simple bolt-in. After assembly and putting anti-seize on the bearing washers and the threads, first I attached the shock at the top of the shock tower. Then I fed two long bolts from the bottom of the a-arm up through the feet on the shock and I put nuts on the bolts to keep them from falling out. I put a floor jack under the lower a-arm and compressed the shock and spring while guiding the lower ball joint into the spindle.


The long bolts guided the shock right into place so I could removed the temporary bolts and install the QA1 supplied bolts and aircraft nuts. After securing all the bolts to attach the shocks the real fun started.

QA1 sells a pair of spanner wrenches that fit the upper and lower nuts. Turning the wrench to raise the ride height is an exercise. The instructions recommend raising the nut to the mid-point for a stock height. Since the Nova car was sitting about an 1" lower than I would like I cranked the shocks up to 3/4's of the way. But when I put the car down the ride height was just slightly higher. So I cranked the springs all the way up when I put the car down it was in the same place as before and the springs were coil bound! In essence I had just compressed the springs. I cranked the spring back down to mid way and called it a day.

The next day I called QA1 and they told me either the shock was too short and I was getting shock bind or the springs too weak and they could not lift the car. I was concerned about the shock length because of the pockets in the lower a-arms the shocks sit 2" lower than stock. I had ordered the 350 lb springs which were recommended for a small block Chevy. Update: These were too weak and would not even lift the car, so we ordered and installed a set of 450 lb springs. 

After considering getting shock extenders, I came to the conclusion that when the shocks are on and the car is jacked up the suspension left the tires with a 3-4" gap between the top of the tire and fender well. This would mean I should be able to raise the car that high with the spring before the shock reached its full extension. The shock length was not the problem. The next day I called Summit and had them ship me a set of 450 lb. springs.

While I waited for the springs to arrive I removed the QA1's and sat the suspension all the way down to just before the tire would contact the inner fender well. I found I needed a 2-1/8 bump stop as opposed to the 1" bump stop that came with the a-arms. A quick run to Pep Boys resulted in a pair of beehive bump stops from Energy Suspension. This is the perfect height and will insure we bump before we rub.

Once the springs arrived we reassembled the shocks with the new springs. Here's Scooter (my son) re-attaching the shock and getting ready to try out the cool spanner wrenches to crank up those springs. I figured I did the first set he could do these. After adjusting the nuts to just under 1/2 way up the collar we put everything back together, put the wheels back on and the car and it sat down right were we wanted!

With everything reattached and torqued down, we took the Nova for a spin around town and everything felt great with no more rubbing. Right now its maybe 1/2" too high, but we are going to leave it to see if it settles. We can tweak it in a few weeks if needed. Tomorrow its back to the alignment shop for a final adjustment and we should be good to go! Bottom line... order 450 lb QA1 springs for your SBC Nova.

After another quick home alignment, we took the Nova to the alignment shop for a "tune-up". This time I slid the tech a $20 and he quite frankly... nailed it.

Power Steering Pump Replacement

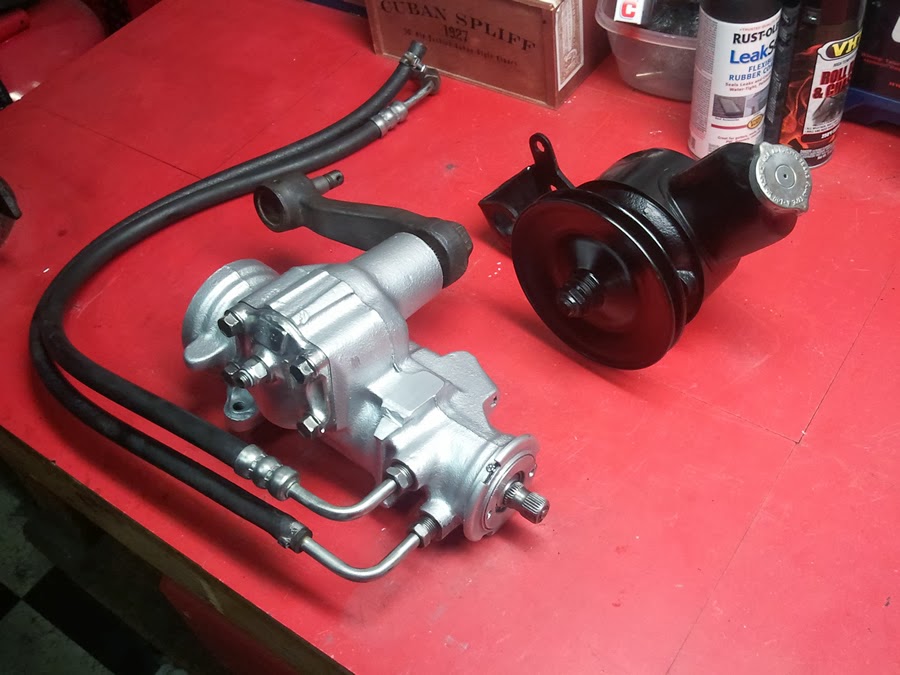
This weekend I replaced the Power Steering pump with a Cardone remanufactured Power Steering Pump part number 20-6000F. This was a pretty straight forward swap with the exception that the high pressure fitting was a female end (top arrow) and my hose requires a male fitting. This was no big deal as I wanted to used my modified fitting and higher pressure plunger from the pump mod so this was swapped on the bench.

The big drama was the low pressure fitting points down (bottom arrow) on these pumps and this ran right into the frame / engine cradle. The solution was to cut the low pressure line where it would come straight out the back. Since this fitting just uses a hose clamp, I double clamped it and hoped for the best.

The test drive was great. The squeal is gone and I can steer with one hand again and there are no leaks. If you replace your steering box, plan on replacing the pump as well.

Friday, March 7, 2014

Saginaw Steering Pump Upgrade

The stock pressure of the 1973 Nova Steering pump is ~900 p.s.i. and the 1988 IROC steering pump likes around 1200 p.s.i. Fortunately the 1973 steering pump can be modified to put out more p.s.i. This mod is well documented both by David Pozzi and is also found this GMTruckCentral.com tutorial which is quite good.

Note: The stock p.s.i. and mod p.s.i. is estimated. Pozzi says based on an article from Lee Power Steering removing the shim(s) will result on 1400 p.s.i where the tutorial at GM Truck Central says it'll net 1200 p.s.i.

Here's the overview:
I left the mounting bracket on the pump and clamped that in the vice. A 1" socket fits this fitting. 
You'll get three parts. From left to right they come out in this order. 1) Main fitting (The part the hose screws into), 2) Flow Piston (Contains the High pressure Bypass; note the one washer/shim under the nut.) , 3) Piston Spring (I had to use a pick to pull out the spring.)

 You need to disassemble the Flow Piston. Possi suggested using a soft vice surface and putting a drill bit in one of the side holes to offer addition resistance. I sat a bolt in there to essentially reduce the length of the bit so it wouldn't bend/break. At this point the 7/16 nut released fairly easily with no scarring on the piston.

  
  1. Remove the Washer/Shim(s) from the Piston. Mine had one. From left to right: Piston Housing, Spring, Limiting Stud (Note: look closely the limiting stud is still in the spring I forgot to pull it out for this pic), the Washer/Shim, Check Ball/BB and the End Cap.
  2. Drill the Main fitting to 5/32"
  3. Stretch the spring to 2-1/4".
Reassemble and install in your pump. I replaced the power steering fluid using AC/Delco 10-5030 and I fully bled the PS system by turning the wheel back and forth ~20x with the wheels off the ground (a good workout). I fired the motor and turned the wheel lock to lock and pushed out the remaining air.

I took the car for a spin around the block and the steering is definitely better that last night after the steering box install. I still don't have much return to center but the steering is crisp and there is no wobble.

I did have a little steering pump squeal at first but that went away. This pump has always squealed on start up when it was cold, so just for fun the pump may get replaced next. But the good news is I can use my upgraded Main fitting and Piston in a replacement pump.

Thursday, March 6, 2014

Quick Ratio Sterring Box Installed

Installed the new steering box last night and took it for a test drive. The steering is definitely heavier than before. It was already heavier than stock because of the Tubular A-Arms and 4.5 deg of Caster but I'm not sure if its the (possibly) larger T-Bar in the Cardone gear or the power steering pump not keeping up. The turning is smooth and I don't have any jittering in the wheel. But it is heavy and I still have very little return to center... maybe a little more pressure will assist the box? The good news is no leaks!

I'm going to take it for a longer drive today but will likely pull the pump tonight and do the Power Steering Pump mod to increase the pump pressure.

Good thing I painted it silver of you might not see it.
Random thoughts so far:
(1) I am really glad I pulled the inner fender well. I still have a little rubbing on the header from steering coupler... so I'm pulling the header again tonight to give it a little more "beating". With the fender well out this is easy. Removing the  inner fender well was time well spent!

(2) The Lares #200 coupler is really nice (and less expensive than the Dorman 31011). I bought the Lares from RockAuto for $25 shipped, the Dorman was $65 from O'reilly. The Lares uses a polyurethane disc where the Dorman looks to have a more traditional rag joint. The Lares has shoulder bolts and aircraft lock nuts where the Dorman uses regular bolts and split lock washers. IMHO overall the Lares is a nicer rag joint / coupler than the Dorman.

Tuesday, March 4, 2014

Steering Box Bench Racing

Since we've gone so far with the front suspension I decided to do the last piece and replace the steering box with a quick-ratio unit. This upgrade is pretty popular with anyone with a GM 60-70's era muscle car and our 1973 Nova was ready for a steering box upgrade. Quite a few folks have said this was the best upgrade they did to their suspension.

The replacement steering box of choice is the XH code from the 85-93 IROC Z-28. But you can see from this chart there are quite a few fast ratio "junk yard" options. The differ in their T-Bar size which changes the steering effort. High effort is a preferred setup as it gives you more feel for the road.
Instead of a 30 year-old junk yard unit or a $400 AGR unit, I opted for a Cardone 27-6550 remanufactured unit. These can be had for about $150 at your local auto parts store. I got my from O'reillys. This box is 2.5 turns lock to lock vs the 4 turns in my stock box. The argument against using one of these is you never know if you are getting the "high effort" internals or a low effort unit. Since we are not Auto Crossing this car I wasn't real concerned. The steering on the Nova is already pretty heavy with the addition of the tubular A-arms and 4 degrees of caster.
Since I knew I had to grind off a chunk of the box to clear the header and the paint on the Cardone unit is pretty bad, I decided to strip and repaint the steering box with caliper paint. The 4 bolt top cover is actually aluminum so I left that natural.
In addition to the box, I needed a set of Lee inserts. The inserts with an installation tool were $25 shipped. These little aluminum pieces allow you to run this o-ring style box with the old flare style fittings on the 1973 Nova power steering hoses. Of note is the fact that the steering box has metric threads and the hoses are SAE but they are an almost exact match so they thread right up.
I put the Lee inserts in the freezer overnight and they tapped right into the steering box. You can see in the photo below I left in the pressure check ball in the box. Some of the Auto-X guys will remove the check ball to allow more flow.
You can also see the "chunk" I took out of the steering box to clear the headers. This had already been done to my old box so I just followed its pattern.

The last piece of the puzzle is the Lares #200 rag joint. This was ordered from Rock Auto for $25 shipped and it allows me to mate the (more) modern steering box to my column. All in all this project is just over $200 in parts.

Parts List 
Coupler (Rag Joint) (GM  7818568, Dorman 31011, Lares #200); Quick Ratio Steering Box (Cardone 27-6550, Duralast 6561); Lee Inserts; GM Power  Steering Fluid.

Removal of the old Box
The first step was to pull out the old box. I've read that guys have done this swap in 3 hours. After all there are just 3 bolts holding the box in place... right? I decided to go with the slow but steady method.

First I loosened the lug nuts on the passenger front wheel and jacked the car up and put it on jack stands. Then I removed the wheel and un-bolted and removed the inner fender well. Next I removed the header and then I removed the castle nut that attaches the Pitman Arm to the center link. I didn't have a pickle fork and was planning to reuse my Pitnam Arm, so in order to get a gear puller on the Pitnam Arm, I needed to remove the disc brake and unbolt the steering arm from the spindle. This allowed me to swing the tie rod out of the way and get my gear puller on the Pitnam Arm ball joint. Finally I unbolted the two nuts on the rag joint and unbolted the 3 bolts on the steering box.
This removal took a lot longer but if I had left the fender well in place this would have been back breaking and knuckle busting. Instead it was a nice Sunday project. Here's the greasy old parts.
I am reusing the power steering pump so I stripped it as well and repainted it and the bracket with Chasis Black. Here's the finished product after some clean-up and a new coat of paint. All ready to go back together.